Table of Contents
ToggleBuilding a covered patio attached to your house adds usable outdoor space and can boost property value by 10-15%. It’s one of those weekend-warrior projects that looks more intimidating than it really is, if you’ve got basic framing skills and aren’t afraid of heights, you can handle most of this yourself. That said, this isn’t a deck rail repair. You’re dealing with ledger attachment to the house structure, footings that need to meet frost depth requirements, and a roof tie-in that has to shed water away from your siding. Plan on permitting, a helper for beam placement, and at least two solid weekends of work. This guide covers design planning, materials, tools, step-by-step construction, and realistic cost and timeline expectations.
Key Takeaways
- Building a covered patio attached to house requires permits, proper ledger attachment to your rim joist, and footings below the frost line to ensure structural integrity.
- Pressure-treated lumber rated for ground contact, galvanized lag screws every 16 inches, and metal flashing are essential to prevent water damage and structural failure at the ledger-house joint.
- Plan for a 3–6 week timeline including permit approval and concrete curing; expect materials to cost $1,800–$4,500 for a typical 12×16-foot patio depending on roofing choice and finishes.
- Step flashing where the roof meets the house wall is critical to prevent water from running behind the new roof and into the house wall cavity, preventing costly water damage.
- Proper slope (3:12 or 4:12 pitch) and drainage—including grading away from the house and gutters on the low eave—are essential to protect your foundation and extend the patio’s lifespan.
Planning Your Attached Covered Patio Project
Before buying a single 2×6 or digging the first footing, you need a plan that accounts for local building codes, site drainage, and how the patio roof will attach to your existing structure.
Check your local building department requirements. Most jurisdictions require permits for covered patios because they involve structural connections to the house and footings below grade. Setback rules, maximum roof height, and footing depth (often 36-42 inches in freeze-thaw climates) vary widely. Submit a basic site plan showing dimensions, footing locations, and roof pitch.
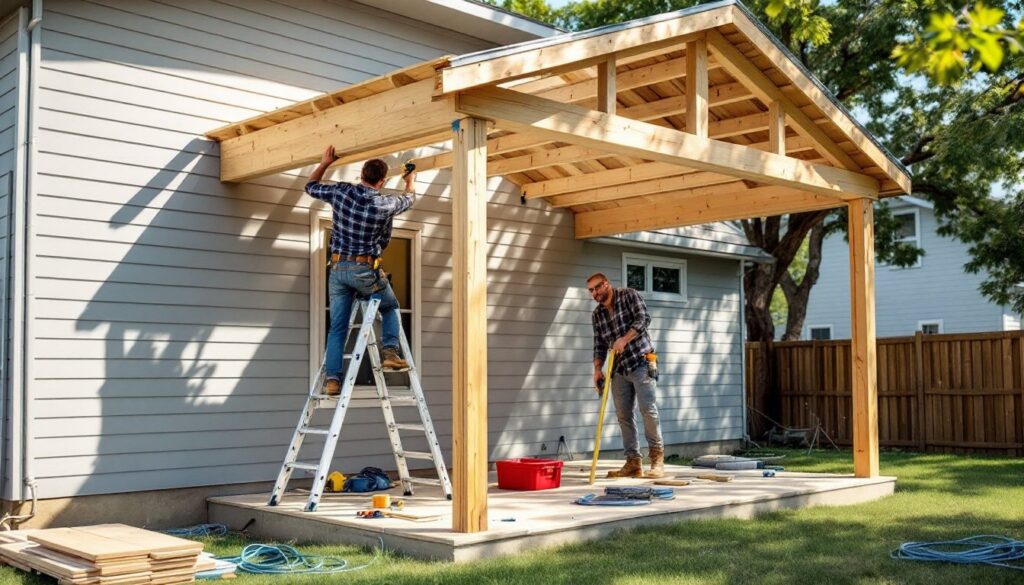
Evaluate your house’s exterior wall. The ledger board, a horizontal 2× member bolted to the house, carries half the roof load. You need to attach it to the rim joist or wall studs, not just siding or sheathing. Brick veneer and stucco walls require through-bolting with washers on the interior side or specialized masonry anchors. Vinyl or fiber-cement siding must be cut back and flashed properly to prevent water intrusion behind the ledger.
Determine your roof style and slope. Most attached patio covers use a shed roof sloping away from the house at a 3:12 or 4:12 pitch (3 or 4 inches of vertical drop per 12 inches of horizontal run). Steeper pitches shed snow and rain better but reduce headroom. The roof can match your house roofing (asphalt shingles, metal panels) or use clear polycarbonate panels for filtered light. Solid roofing blocks UV and weather completely: polycarbonate gives partial shade and still allows plant growth underneath.
Choosing the Right Design and Materials
Lumber selection: Pressure-treated southern yellow pine rated for ground contact (0.40 pcf retention) is standard for posts and beams. Use 2×8 or 2×10 rafters spaced 16 or 24 inches on center, depending on your span and snow load. For a 12-foot projection from the house, 2×8 rafters at 24 inches OC usually suffice in low-snow areas: consult span tables in the IRC for your specific load.
Roofing materials: Asphalt shingles (budget-friendly, match existing roof), corrugated metal panels (durable, fast to install), or polycarbonate multiwall panels (lightweight, lets in diffused light). Metal and polycarbonate attach to purlins (horizontal 2×4 nailers across rafters). Shingles require solid sheathing (1/2-inch OSB or plywood).
Foundation options: In stable soil, poured concrete footings with embedded post anchors are the gold standard. Diameter and depth depend on local frost line and soil bearing capacity, typical footings are 12 inches in diameter and extend below the frost line. Precast concrete pier blocks work for small, low-profile patios in mild climates but won’t pass code in most areas for attached structures.
Flashing and fasteners: Use galvanized or stainless ledger flashing (Z-bar or step flashing) to direct water away from the ledger-house joint. Lag screws or structural screws (1/2-inch diameter, 5-6 inches long) every 16 inches through the ledger into solid framing. Don’t skimp here, inadequate ledger attachment has caused many patio collapses.
Essential Tools and Materials You’ll Need
Tools:
- Circular saw or miter saw (miter saw gives cleaner angle cuts on rafters)
- Drill/driver and impact driver
- Level (4-foot and 2-foot), string line, and chalk line
- Post hole digger or auger (gas-powered auger speeds up footing work)
- Framing square and speed square
- Ladder and scaffolding or sturdy work platform
- Clamps and adjustable braces
- Safety glasses, work gloves, hearing protection, and dust mask
Materials (for a typical 12×16-foot patio):
- One 2×10 or 2×12 ledger board, 16 feet (pressure-treated)
- Four 4×4 or 6×6 pressure-treated posts (8-10 feet, depending on desired ceiling height)
- Two 2×8 or 2×10 beams, 16 feet each
- Eight to ten 2×8 rafters, 12 feet
- Ledger flashing and house wrap or peel-and-stick membrane
- Concrete mix (eight 80-lb bags per footing, four footings typical)
- Post anchors (galvanized, adjustable base)
- 1/2-inch lag screws or structural screws, 5-6 inches long
- Joist hangers (face-mount for rafter-to-ledger connection)
- Roofing material: shingles and underlayment, metal panels and roofing screws with rubber washers, or polycarbonate panels and closure strips
- Galvanized framing nails, 3-inch structural screws
Quantities vary by design. Budget an extra 10% for waste and cuts. If you’re adding electrical for lights or fans, include conduit, boxes, wire, and a GFCI-protected circuit, hire an electrician if you’re not comfortable pulling a permit and doing the rough-in yourself.
Step-by-Step Construction Process
Installing the Ledger Board and Foundation
-
Mark the ledger height on the house. Measure down from the bottom of the door threshold or siding to establish the top of the finished patio deck (if adding decking) or the top of the ledger for a ground-level slab patio. The ledger should sit high enough that the sloped roof clears the door opening and any windows.
-
Cut back siding and install flashing. If your house has lap siding, cut a horizontal strip 1-2 inches taller than the ledger width. Slide metal ledger flashing up under the siding above the cut, then tack it in place. Seal the top edge with a bead of exterior sealant.
-
Attach the ledger to the house framing. Position the pressure-treated ledger board against the wall, level it, and clamp it temporarily. Drill pilot holes every 16 inches and drive 1/2-inch × 5-inch lag screws (or equivalent structural screws) through the ledger, sheathing, and into the rim joist or studs. Each fastener should bite at least 3 inches into solid wood. For masonry, use 1/2-inch wedge anchors or sleeve anchors rated for the load.
-
Lay out and dig footing holes. Measure out from the house to establish the front beam location (typically 10-12 feet for a standard patio). Mark post positions along that line, spacing them 6-8 feet apart. Dig footing holes to the depth required by code (below frost line) and 12-14 inches in diameter. Pour concrete, set galvanized post anchors while the concrete is wet, and use a string line to align them. Let concrete cure for at least 48 hours.
-
Set posts and install the beam. Cut 4×4 or 6×6 pressure-treated posts to height (account for slope, the front of the patio will be lower than the ledger). Secure posts in the anchors and brace them plumb with temporary diagonal bracing. Rest a doubled 2×8 or 2×10 beam on top of the posts, level it, and fasten it with structural screws or through-bolts. A helper is essential here: beams are heavy and awkward.
Building the Roof Structure and Adding Coverage
-
Install rafter hangers on the ledger. Snap a chalk line along the ledger at your planned rafter spacing (16 or 24 inches OC). Nail galvanized joist hangers to the ledger at each mark, following the manufacturer’s nailing pattern. Use all the holes, under-nailing is a common DIY mistake that costs you shear strength.
-
Cut and install rafters. Measure the actual distance from the ledger to the outer beam. Cut 2×8 rafters to length, adding a few inches for overhang if desired. Cut a bird’s mouth notch where each rafter sits on the beam (a triangular notch that lets the rafter sit flat on the beam while maintaining slope). Set each rafter into its hanger at the ledger, rest the bird’s mouth on the beam, and toenail or use rafter ties at the beam connection.
-
Add blocking or purlins. For metal or polycarbonate roofing, screw 2×4 purlins across the tops of the rafters, perpendicular to them, spacing them per the roofing manufacturer’s specs (typically 24 inches OC). For shingle roofing, sheath the entire rafter plane with 1/2-inch plywood or OSB, leaving 1/8-inch gaps between sheets for expansion.
-
Install roofing. For asphalt shingles, roll out underlayment (felt or synthetic), then shingle from the bottom edge up, overlapping rows per manufacturer’s instructions. For corrugated metal, start at the low edge and work up, overlapping panels by one corrugation and fastening through the ridges with screws and rubber washers. Polycarbonate panels install similarly, with closure strips at the ends to prevent insect entry and to seal edges. Advanced techniques for roofing connections and flashing can improve weather resistance and longevity.
-
Flash the roof-to-house junction. Install step flashing where the patio roof meets the house wall, each shingle course should have a corresponding piece of metal step flashing tucked behind it and under the siding. This is critical to prevent water from running behind your new roof and into the house wall cavity. Many builders also add a drip edge along the low eave to direct water away from the beam and posts.
Costs, Permits, and Timeline Expectations
Costs (2026 estimates): For a 12×16-foot attached covered patio with pressure-treated framing and asphalt shingle roofing, expect materials to run $1,800–$3,000, depending on lumber prices and regional availability. Concrete, hardware, flashing, and roofing add up quickly. If you opt for a metal or polycarbonate roof and upgraded 6×6 posts with decorative capitals, budget $3,000–$4,500. Labor by a contractor typically doubles or triples material cost, many pros charge $25–$50 per square foot installed.
Permits and inspections: Most jurisdictions require a building permit ($100–$400) and one or more inspections (footing, framing, final). Submit your plan early: approval can take 2–6 weeks. Don’t start work before permit approval. Unpermitted structures can complicate home sales and insurance claims. Some areas also require an engineer’s stamp if the patio exceeds a certain size or if your house is on a slope.
Timeline: With a helper and average DIY skills, expect:
- Weekend 1: Permit prep, layout, dig and pour footings (allow 2-3 days cure time mid-week)
- Weekend 2: Ledger installation, set posts and beam, install rafters, sheathing or purlins
- Weekend 3 (or weeknight hours): Roofing, flashing, final details
Weather, soil conditions, and inspection scheduling can stretch the timeline. Don’t rush the footings or ledger attachment, these are the structural anchors of the entire project. For general home renovation tutorials and expert project guides, experienced builders recommend staging material deliveries and completing one phase fully before starting the next to avoid rework.
Final tips: Double-check your measurements before every cut (the old “measure twice, cut once” isn’t just a cliché). Use galvanized or stainless fasteners throughout to prevent rust staining and structural degradation. If your patio will have ceiling fans or lighting, rough in electrical before closing up the roof. And remember, a covered patio is only as good as its drainage, grade the area to slope away from the house and consider gutters on the low eave to manage runoff.